
With this tutorial I am going to show you a way to create a waving effect using Adobe Photoshop (It can also be done with other graphic design software since the tools we are going to use can be found in almost all graphic design programs). I use this technique mainly for creating waving flags, however it can be used on any image and in various graphic design projects.
Let’s start
Draw or open your photo. For this Tutorial I am going to use this USA flag.

1) Double click on the padlock next to your flag layer to unlock the layer

2) Go to “Image” -> “Canvas Size” and increase the canvas size by 20% both horizontal and vertical. Make sure you have the “Relative” box is checked.
3) Go to “Image” -> “Rotate Canvas” -> 90 CW
4) Go to “Filter” -> “Distort” -> “Shear” and use these settings
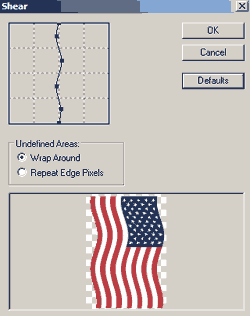
5) Go to “Image” -> “Rotate Canvas” -> 90 CCW
6) 4) Go to “Filter” -> “Distort” -> “Shear” and use these settings
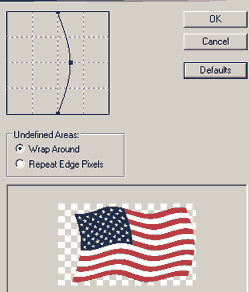
7) Create two new layers and name the one Highlights and the other Shadows.
8) Select the highlights layer, pick the “Rectangle Marque Tool” (M) and make sure that the option checked is “Add to selection 
Then select four vertical rectangles and fill them with a dark grey. After you have done this you should have something like this

9) Without deselecting select the shadows layer and go to “Select” -> “Inverse” and fill the selection with the same color and finally deselect (“Select” -> “Deselect”)
10) You should now have the shadows layer selected.
Go to “Filter” -> “Blur” -> “Gaussian Blur” and use a radius of 15.

You may need to play around with the settings depending on the size of your original file. For reference, the image that I used for this tutorial was 1000*600 pixels.
11) Go to “Filter” -> “Distort” -> “Shear” and use the settings we last used for the flag
12) Select the highlights layer and repeat steps 10 and 11
13) Click on the flag layer while having Ctrl pressed. Invert the selection. Now you should have a selection that includes everything but the flag. First select the Shadows layer and hit Del and then the Highlights layer and hit Del again
14) Set the blending mode of the Highlights layer to “Screen” and the Opacity at 60%. Finally set the Opacity of the shadows layer to 40% (leave the blending mode to normal). We are all done, you should now have your waving flag on a transparent background ready to be used for your graphic or web design projects.
This is my final result

Comments are closed.